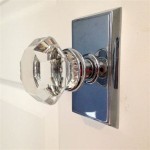
Having a broken glass shower door handle can be an annoying and potentially dangerous problem for any homeowner. Fortunately, replacing a broken shower door handle is a relatively straightforward process that requires just a few basic tools. Here’s how to replace your glass shower door handle in just a few easy steps.
Collect the Tools You’ll Need
Replacing a glass shower door handle is a fairly simple job, but you will need a few basic tools to complete it. You’ll need a Phillips head screwdriver, a flathead screwdriver, pliers, a drill, and a new shower door handle. If you have any doubts about the size or type of handle you require, consult with a professional before you purchase the replacement.
Remove the Old Handle
Begin by using the Phillips head screwdriver to remove the screws that hold the handle in place. Once the screws are removed, carefully pull the handle away from the door. If it’s stuck, use the pliers to gently pry it loose. Once the handle is removed, inspect the area to make sure no further repairs are needed.
Install the New Handle
Next, use the drill to create pilot holes in the exact same spots as the old handle. This will make it easier to install the new handle. Then, use the flathead screwdriver to attach the new handle to the door. Finally, use the Phillips head screwdriver to tighten the screws and secure the handle in place.
Testing and Finishing Up
Once the new handle is installed, it’s time to test it. Open and close the door several times to make sure the handle is functioning properly. If it is, you’re done! If not, double check all of the screws and make sure everything is secure. Once you’re sure the handle is installed correctly, you can enjoy your newly repaired glass shower door.


![[Download 35+] Glass Shower Door Handles Replacement](https://i2.wp.com/images-na.ssl-images-amazon.com/images/I/51U-v3kg7KL._AC_SL1024_.jpg)


Related Posts