Installing a door glass frame kit is a great way to add a modern aesthetic to your home. Not only will it make your door look stylish and attractive, but it will also increase the value of your property. However, installing a door glass frame kit is no easy task, and it requires a certain level of skill to get the job done right. In this article, we’ll provide you with a step-by-step guide to help you install a door glass frame kit.
Step 1: Prepare the Door
The first step in installing a door glass frame kit is to prepare the door for installation. This involves removing the existing hardware from the door, such as the door knob and hinges. Once the hardware is off, you’ll need to clean the door and remove any dirt or debris that may be present. You’ll also need to measure the door to ensure you’re purchasing the correct size frame kit.
Step 2: Install the Frame
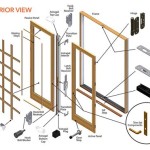
Once the door is prepared, you can begin to install the frame. You’ll need to carefully measure the door and frame to ensure it fits properly. Once the measurements are correct, you can begin to install the frame. Start by attaching the frame to the door jamb on one side. Then, secure the frame to the other side of the door jamb. Lastly, secure the frame to the top and bottom of the door.
Step 3: Install the Glass
Once the frame is securely in place, you can begin to install the glass. Start by inserting the glass into the frame. Then, carefully secure the glass with the provided screws. Make sure the screws are tight and secure. Lastly, use the provided caulk to seal the gaps between the frame and door jamb.
Step 4: Finishing Touches
The final step in installing a door glass frame kit is to add the finishing touches. This includes installing the door handle, locks, and other hardware. Once the hardware is installed, you can then test the door to make sure it opens and closes properly. And with that, you’ll have successfully installed a door glass frame kit.


Related Posts