Replacing Shower Door Glass: A Comprehensive Guide
Maintaining a pristine bathroom requires attention to every element, including the shower door glass. Over time, glass panels may accumulate water spots, scratches, or even chip, compromising both aesthetics and functionality. Replacing shower door glass is a crucial task that demands precision and planning. This guide will walk you through the essential aspects of replacing shower door glass, ensuring a successful outcome.
Safety First
Before commencing any work, safety should be paramount. Put on protective gear such as gloves and safety glasses to avoid cuts or injuries from broken glass. Additionally, secure the shower door frame firmly to prevent it from toppling over during the replacement process.
Gather Tools and Materials
The following tools and materials are essential for replacing shower door glass:
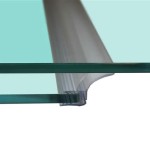
- Replacement glass panel
- Measuring tape
- Glass cutter
- Silicone sealant
- Caulk gun
- Utility knife
- Razor blade
- Clean rags
Measuring for the Replacement Glass
Accurate measurements are critical for a perfect fit. Use a measuring tape to determine the height and width of the opening where the glass panel will be installed. Measure twice to ensure accuracy and avoid costly mistakes.
Cutting the Glass
Wear safety glasses during this step. Use a glass cutter to carefully score the glass along the measured dimensions. Ensure that the scoring is deep enough to allow for clean breaks. Bend the glass gently along the score line until it snaps apart.
Removing the Old Glass
Put on gloves to protect your hands. Remove any old silicone sealant or caulk around the edges of the old glass using a utility knife or razor blade. Carefully lift the old glass panel out of the frame.
Cleaning the Frame
Thoroughly clean the shower door frame with a clean rag to remove any residual sealant or dirt. This will ensure proper adhesion for the new silicone sealant.
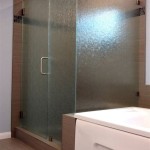
Installing the New Glass
Apply a bead of silicone sealant around the edges of the glass panel. Position the glass panel into the frame, making sure it is centered and aligns correctly. Press the glass firmly into the sealant, ensuring a watertight seal.
Finishing Touches
Once the glass is installed, apply a thin bead of caulk around the edges to enhance the seal. Smooth out the caulk using a damp rag or your finger. Allow the sealant and caulk to cure for at least 24 hours before using the shower.
Maintenance and Cleaning
To keep your newly replaced shower door glass pristine, regular cleaning is essential. Use a mild glass cleaner and a soft cloth to wipe down the glass surfaces. Avoid using abrasive cleaners or sponges, as they can scratch the glass.
By following these steps, you can successfully replace shower door glass, restoring the functionality and aesthetics of your bathroom. Remember to prioritize safety, measure accurately, and take your time to ensure a professional-looking outcome.

Sliding Shower Door Installation A Comprehensive Guide

Step By Guide To Installing A Frameless Shower Door

Mastering The Art Of Glass Shower Door Installation In Dayton Oh A Comprehensive Guide From Alluring

How To Fix Shower Doors Complete Door Repair Guide

Complete Guide To Shower Door Installation Replacement Homeadvisor

How To Install Shower Door Step By

The Ultimate Guide To Installing Frameless Shower Doors Miami Fl Patch

Thinner Framed Semi Frameless Glass Shower Doors Innovate Building Solutions

Sliding Shower Door Installation A Comprehensive Guide

Tips To Choose Perfect Shower Cubicle Buyers Guide Ais Glasxperts
Related Posts