Replacing glass in a door is a surprisingly simple do-it-yourself project. While it may seem daunting at first, with the right tools and materials it can be a quick and easy task. Whether you’re replacing a broken pane or just want to upgrade the style of your door, here’s a comprehensive guide to replacing glass in a door at home.
Required Tools and Materials
Before you get started, make sure you have the right tools and materials on hand. You’ll need a utility knife, silicone sealant, putty knife, a small hammer, and a screwdriver. Additionally, you’ll need the glass you’re replacing, which can be purchased at a local hardware store.
Removing the Old Glass
Once you have all the necessary tools and materials, it’s time to begin. Start by removing the old glass. First, use the utility knife to cut through the old putty. Once you’ve cut through the putty, use the screwdriver to remove the screws that hold the glass in place. Then, carefully remove the old glass and discard it.
Installing the New Glass
Now that the old glass has been removed, you can install the new glass. Start by using the putty knife to apply a thin layer of silicone sealant to the edges of the door frame. Then, place the new glass in the frame and press it firmly in place. Finally, use the small hammer to tap in the screws and secure the glass.
Finishing Up
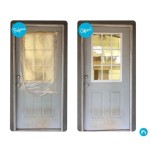
Once the new glass is installed, you’ll need to finish up. Start by using the putty knife to apply a thin layer of putty to the edges of the frame. This will help to ensure a tight seal around the glass. Finally, use the utility knife to trim off any excess putty. And you’re done!
Conclusion
Replacing glass in a door is a surprisingly simple do-it-yourself project. With the right tools and materials, it’s a quick and easy task that can be done in a matter of minutes. So if you’re looking to replace or upgrade the glass in your door, you can do it yourself with just a few simple steps.


:max_bytes(150000):strip_icc()/5-IMG_4631-56a4a2ca5f9b58b7d0d7efce.jpg)


:max_bytes(150000):strip_icc()/14-finished-56a4a2cc5f9b58b7d0d7efdd.jpg)
:max_bytes(150000):strip_icc()/4-IMG_4624-56a4a2ca5f9b58b7d0d7efcb.jpg)

Related Posts